Showing posts with label handmade. Show all posts

Saturday, January 28, 2017

Makkachin - Yuri!!! on ice - Free crochet pattern

It's a poodle dog, his name is Makkachin! This little dog from anime Yuri on ice, is so precious. So I decide to crochet him. This finished doll's body is a little shorter than the one in picture, but it my intention to do that! I think smaller body Makkachin is more suitable as a key chain that the long body one. :D

Picture from http://yurionice.wikia.com

At first, I was thinking about using some fluffy yarn. But after thinking thoroughly, if I do that, how can people seeing the stitches!? So I change back to my usual yarn. I try my best to find the most similar yarn color that I have in my stock, still a little bit more yellow side.

He's harder than I thought he would be, especially his cheek! But in the end I manage to finished him and share this pattern with you guys. Hope you enjoy!


ABBREVIATION
sc- single crochet
dc - double crochet
sl- slip stitch
ch- chain

sc2tog - decrease single crochet
BLO - Back loop only
puff - 3 single crochet puff stitch


[Video is now loading]


Pattern Instruction
Cheek1
Rnd1: 2 ch, 6 sc in the 1st chain, sl :: 6 stitches
Rnd2: 1 ch, [2 sc in next stitch] 6 times, sl :: 12 stitches
Rnd3: 1 ch, sc in next 12 stitch, sl :: 12 stitches
Fasten off.

Cheek2
Rnd1: 2 ch, 6 sc in the 1st chain, sl :: 6 stitches
Rnd2: 1 ch, [2 sc in next stitch] 6 times, sl :: 12 stitches
Rnd3: 1 ch, sc in next 12 stitch, sl :: 12 stitches

Join both cheek together
Rnd4: 1 ch, sc in next stitch, sc to join 2 pieces together, sc in the same stitch on second piece we just join, sc in next 10 stitch, sc to join 2 pieces together, sc in the same stitch, sc in next 9 stitch,sl :: 24 stitches
Rnd5 - Rnd6: 1 ch, sc in next 24 stitch, sl :: 24 stitches
Rnd7: 1 ch, [sc2tog] 12 times, sl :: 12 stitches
Rnd8 -Rnd10: 1 ch, sc in next 12 stitch, sl :: 12 stitches
Rnd11: 1 ch, [sc2tog] 6 times, sl :: 6 stitches
Fasten off.

Ears
Rnd1: 2 ch, 6 sc in the 1st chain, sl :: 6 stitches
Rnd2: 1 ch, [sc in next stitch, 2 sc in next stitch] 3 times, sl :: 9 stitches
Rnd3 -Rnd8: 1 ch, sc in next 9 stitch, sl :: 9 stitches
Rnd9: 1 ch, [sc in next stitch, sc2tog] 3 times, sl :: 6 stitches
Rnd10: 1 ch, [sc2tog] 3 times, sl :: 3 stitches
Fasten off.

Tongue
3 ch, sc in the 2nd ch from hook, sc in next chain.
Fasten off.

Tongue is very small, you can alternatively cut red felt sheet then sewing instead.

Nose
3 ch, sl in the 2nd ch from hook, sl in next chain.
Fasten off.

The same way with tongue, I feel like Makkachin's nose should be smaller than this, so if you have felt sheet you can cut it into the shape of dog's nose and glue it, instead of crochet it like me.

Body
Rnd1: 2 ch, 6 sc in the 1st chain, sl :: 6 stitches
Rnd2: 1 ch, [2 sc in next stitch] 6 times, sl :: 12 stitches
Rnd3: 1 ch, [sc in next stitch, 2 sc in next stitch] 6 times, sl :: 18 stitches
Rnd4: 1 ch, [sc in next 2 stitch, 2 sc in next stitch] 6 times, sl :: 24 stitches
Rnd5: BLO, sc in next 11 stitch, puff, sc in next 6 stitch, puff, sc in next 5 stitch, sl :: 24 stitches
Rnd6: 1 ch, sc in next 24 stitch, sl :: 24 stitches
Rnd7: 1 ch, [sc in next 2 stitch, sc2tog] 6 times, sl :: 18 stitches
Rnd8-Rnd9: 1 ch, sc in next 18 stitch, sl :: 18 stitches
Rnd10: 1 ch, [sc in next stitch, sc2tog] 6 times, sl :: 12 stitches
Rnd11-Rnd12: 1 ch, sc in next 12 stitch, sl :: 12 stitches
Rnd13: 1 ch, [sc in next stitch, sc2tog] 4 times, sl :: 8 stitches
Rnd14: 1 ch, [sc2tog] 4 times, sl :: 4 stitches
Fasten off.
** For "puff" see the abbreviation above.

Tail
Rnd1: 2 ch, 6 sc in the 1st chain, sl :: 6 stitches
Rnd2: 1 ch, [sc in next stitch, 2 sc in next stitch] 3 times, sl :: 9 stitches
Rnd3 -Rnd7: 1 ch, sc in next 9 stitch, sl :: 9 stitches
Rnd8: 1 ch, [sc in next stitch, sc2tog] 3 times, sl :: 6 stitches
Rnd9: 1 ch, [sc2tog] 3 times, sl :: 3 stitches
Fasten off.

After finished crochet every parts, sew them together. Or if you not familiar with sewing, you can also gluing them. But be careful not to put too much glue, so it not clearly visible and reduce chance to dirty other part.

If you want a bigger version of him, easiest way is to increase the yarn size and hook size. Or if you don't want to by new yarn, use the same yarn but crochet 2 strand of yarn together at the same time with bigger hook. Modify the pattern is also an option, but in this case please give some credit to this original post of Mkkachin.

That's it! If you have any question or trouble during crochet him, comment here or under the tutorial video, I will answer with the best I can. See you next post.

****Want to sell the finis doll? See private policy here: https://amigurumipianosound.blogspot.co.uk/p/pattern-poly.html

--------------------------------
FOLLOW ME ON
Youtube : https://www.youtube.com/channel/UCO6B-ObiFoh3cOemJQfoSJA
FACEBOOK: https://www.facebook.com/pianosound
Instagram: https://www.instagram.com/amigurumipianosound/
BLOGGER : https://amigurumipianosound.blogspot.com/
--------------------------------
SUPPORT this channel through:
Patreon :https://www.patreon.com/AmigurumiPianosound

Or purchase my paid pattern at
Craftsy : https://www.craftsy.com/user/2234916/pattern-store
ETSY: https://www.etsy.com/shop/Pianosound
RAVELRY : http://www.ravelry.com/patterns/sources/noramon-drons-ravelry-store/patterns

/////For anyone who willing to helping translate pattern from English to other language here:
http://www.youtube.com/timedtext_cs_panel?tab=2&c=UCO6B-ObiFoh3cOemJQfoSJA

Saturday, December 31, 2016

Chibi Zapdos Pokemon Free Crochet Pattern

Chibi Zapdos Pokemon Free Crochet Pattern

First I was planned to upload this tutorial on Christmas, but I cannot finished the video editing in time. So I postpone it to the New year eve instead. :D

I am not very good at talking, so wish you all happy new year and thank you for staying with me in wonderful 2016. HAPPY NEW YEAR.

It's Zapdos even though it also look like some bird from angry bird, but I still insist that this is Zapdos. A baby Zapdos, LoL.

One of the legendary pokemon, from pokemon generaation I. I also have pattern for Articuno and Moltres too. If yo like this Chibi version of them, Don't forget to check it out ;)


ABBREVIATION
sc- single crochet
dc - double crochet
hdc - half double crochet
sl- slip stitch
ch- chain


Body 
Rnd1: 2 ch, 6 sc in the 1st chain, sl :: 6 stitches
Rnd2: 1 ch, [2 sc in next stitch] 6 times, sl :: 12 stitches
Rnd3: 1 ch, [sc in next stitch, 2 sc in next stitch] 6 times, sl :: 18 stitches
Rnd4: 1 ch, [sc in next 2 stitch, 2 sc in next stitch] 6 times, sl :: 24 stitches
Rnd5: 1 ch, [sc in next 3 stitch, 2 sc in next stitch] 6 times, sl :: 30 stitches
Rnd6 - Rnd11: 1 ch, sc in next 30 stitch, sl :: 30 stitches
Rnd12: 1 ch, [sc in next 3 stitch, sc2tog] 6 times, sl :: 24 stitches
Rnd13: 1 ch, sc in next 24 stitch, sl :: 24 stitches
Rnd14: 1 ch, [sc in next 2 stitch, sc2tog] 6 times, sl :: 18 stitches
Rnd15: 1 ch, sc in next 18 stitch, sl :: 18 stitches
Rnd16: 1 ch, [sc in next stitch, sc2tog] 6 times, sl :: 12 stitches
Rnd17: 1 ch, [sc2tog] 6 times, sl :: 6 stitches
Fasten off, and sew hole closed.

Eyes
Rnd1: 2 ch, 4 sc in the 1st chain, sl :: 4 stitches
Leave some lenght of yarn and Fasten off.

Beak
Rnd1: 2 ch, 3 sc in the 1st chain, sl :: 3 stitches
Rnd2: 1 ch, sc in next 3 stitch, sl :: 3 stitches
Rnd3: 1 ch, sc in next 3 stitch, sl :: 3 stitches
Leave some length of yarn and Fasten off.
Sewing the beak between both wings.

Wing(Yellow)
Rnd1: 6 ch, 2 dc in the 4th ch from hook, dc in next stitch, 2 dc in next stitch, turn
Rnd2: 3 ch, sl in the 2nd ch from hook, sc in next stitch, skip 1, sl in next stitch, [3 ch, sl in the 2nd ch from hook, sc in next stitch, sl in next stitch] 2 times
Leave some length of yarn and Fasten off.
Sewing both wing on Rnd10.

Wing(Black)
8 ch, sl in the 2nd ch from hook, sl in next 3 stitch, skip 1, sl in next stitch, 5 ch, sl in the 2nd ch from hook, sl in next 3 stitch, sl in next stitch.
Leave some length of yarn and Fasten off.

Tail(Yellow)
Rnd1: 6 ch, 2 dc in the 4th ch from hook, dc in next stitch, 2 dc in next stitch, turn
Rnd2: 4 ch, sl in the 2nd ch from hook, sl in next stitch, sc in next stitch, skip 1, sl in next stitch, [4 ch, sl in the 2nd ch from hook, sl in next stitch, sc in next stitch, sl in next stitch] 3 times.
Leave some length of yarn and Fasten off.

Tail(Black)
10 ch, sl in the 2nd ch from hook, sl in next 4 stitch, skip 1, sl in next stitch, [6 ch, sl in the 2nd ch from hook, sl in next 4 stitch, sl in next stitch] 2 times.
Leave some length of yarn and Fasten off.

Comb make 2 pieces
9 ch, 2 dc in the 3rd ch from hook, 2 ch, sl in next stitch, 3 ch, tr2tog, 3ch, sl in next stitch, 2 ch, dc in next stitch, 2 ch, sl in next stitch.
Leave some length of yarn and Fasten off.


******SELLING THE DOLL YOU MADE******
Feel free to sell your finished doll! But if you are selling them online, please include link to this channel or blogger in your product description.

--------------------------------
FOLLOW ME ON

FACEBOOK: https://www.facebook.com/pianosound
Instagram: https://www.instagram.com/amigurumipianosound/
BLOGGER : https://amigurumipianosound.blogspot.com/
--------------------------------
SUPPORT this channel through:
Patreon :https://www.patreon.com/AmigurumiPianosound

Or purchase my paid pattern at
Craftsy : https://www.craftsy.com/user/2234916/pattern-store
ETSY: https://www.etsy.com/shop/Pianosound
RAVELRY : http://www.ravelry.com/patterns/sources/noramon-drons-ravelry-store/patterns

Sunday, November 20, 2016

Free Crochet Pokemon Poliwag Pattern and Tutorial

It's Poliwag!! Cute little water pokemon. Actually I finish filming him like a week ago but I don't have time to finish the video tutorial so it come out this little late. But finally I manage to finish this free pattern for you guys, Enjoy!!


Pattern instruction


[VIDEO TUTORIAL]


ABBREVIATION
sc- single crochet
dc - double crochet
sl- slip stitch
ch- chain
sc2tog- decrease single crochet


Body - with blue yarn
Rnd1: 2 ch, 6 sc in the 1st chain, sl :: 6 stitches
Rnd2: 1 ch, [2 sc in next stitch] 6 times, sl :: 12 stitches
Rnd3: 1 ch, [sc in next stitch, 2 sc in next stitch] 6 times, sl :: 18 stitches
Rnd4: 1 ch, [sc in next 2 stitch, 2 sc in next stitch] 6 times, sl :: 24 stitches
Rnd5: 1 ch, [sc in next 3 stitch, 2 sc in next stitch] 6 times, sl :: 30 stitches
Rnd6 - Rnd11: 1 ch, sc in next 30 stitch, sl :: 30 stitches
Rnd12: 1 ch, [sc in next 3 stitch, sc2tog] 6 times, sl :: 24 stitches
Rnd13: 1 ch, [sc in next 2 stitch, sc2tog] 6 times, sl :: 18 stitches
Rnd14: 1 ch, [sc in next stitch, sc2tog] 6 times, sl :: 12 stitches
Rnd15: 1 ch, [sc2tog] 6 times, sl :: 6 stitches
Fasten off.

Stomach
Rnd1: 2 ch, 6 sc in the 1st chain, sl :: 6 stitches
Rnd2: 1 ch, [2 sc in next stitch] 6 times, sl :: 12 stitches
Rnd3: 1 ch, [sc in next stitch, 2 sc in next stitch] 6 times, sl :: 18 stitches
Rnd4: 1 ch, [sc in next 2 stitch, 2 sc in next stitch] 6 times, sl :: 24 stitches
Fasten off.

Using black thread to embroidery swirl graphic on his belly.

Feet
Rnd1: 4 ch, sc on 2nd stitch from hook, sc in next 2 stitch, 3 sc in next stitch, sc in next 2 stitch, 2 sc in next stitch, sl :: 10 stitches
Rnd2: 1 ch, sc in next 10 stitch, sl :: 10 stitches
Rnd3: 1 ch, sc in next 2 stitch, [sc2tog] 3 times, sc in next 2 stitch, sl :: 7 stitches
Fasten off.

Eyes - with black yarn
Rnd1: 2 ch, 4 sc in the 1st chain, sl :: 4 stitches
Fasten off.

Tail
Rnd1: 10 ch, sc on 2nd stitch from hook, sc in next 2 stitch, hdc in next 2 stitch, dc in next 4 stitch, 5dc in next stitch, dc in next 4 stitch,  hdc in next 2 stitch, sc in next 2 stitch, 2 sc in next stitch,sl :: 24 stitches

--------------------------------
FOLLOW ME ON

FACEBOOK: https://www.facebook.com/pianosound
Instagram: https://www.instagram.com/amigurumipianosound/
BLOGGER : https://amigurumipianosound.blogspot.com/
--------------------------------
SUPPORT this channel through:
Patreon :https://www.patreon.com/AmigurumiPianosound

Or purchase my paid pattern at
Craftsy : https://www.craftsy.com/user/2234916/pattern-store
ETSY: https://www.etsy.com/shop/Pianosound
RAVELRY : http://www.ravelry.com/patterns/sources/noramon-drons-ravelry-store/patterns


Saturday, June 18, 2016

DOTA 2 - Phoenix Octo crochet pattern


I know the game called "DOTA", but I never once try to play this game. Not because of it's a bad game or anythings, I just afraid that I will be addicted, lol. I am a type of person that easily addicted to games so I always avoid playing game that need to take time for playing. When my brother hand me a sketch of some little chick(in my point of view) and request for a key chain of this character, so I decide to made it and why not sharing it.


[VIDEO TUTORIAL]


Pattern instruction

Body
Rnd1: 2 ch,6 sc in the 1st chain, sl :: 6 stitches
Rnd2: 1 ch, [2 sc in next stitch] 6 times, sl :: 12 stitches
Rnd3: 1 ch, [sc in next stitch, 2 sc in next stitch] 6 times, sl :: 18 stitches
Rnd4: 1 ch, [sc in next 2 stitch, 2 sc in next stitch] 6 times, sl :: 24 stitches
Rnd5: 1 ch, [sc in next 3 stitch, 2 sc in next stitch] 6 times, sl :: 30 stitches
Rnd6: 1 ch, [sc in next 4 stitch, 2 sc in next stitch] 6 times, sl :: 36 stitches
Rnd7 - Rnd12: 1 ch, sc in next 36 stitch, sl :: 36 stitches
Rnd13: 1 ch, [sc in next 4 stitch, sc2tog] 6 times, sl :: 30 stitches
Rnd14: 1 ch, [sc in next 3 stitch, sc2tog] 6 times, sl :: 24 stitches
Rnd15: 1 ch, [sc in next 2 stitch, sc2tog] 6 times, sl :: 18 stitches
Rnd16: 1 ch, [sc in next stitch, sc2tog] 6 times, sl :: 12 stitches
Rnd17: 1 ch, [sc2tog] 6 times, sl :: 6 stitches
Rnd18: 1 ch, sc2tog until the hole close.
Fasten off

Yellow wing
Rnd1: 4 ch, 3dc in 1st stitch, turn :: 3 stitches
Rnd2: 3 ch, 2dc in next stitch, dc in next stitch, 2dc in next stitch, turn :: 5 stitches
Rnd3: 3 ch, 2dc in next stitch, dc in next 3 stitch, 2dc in next stitch, turn  :: 7 stitches
Rnd4: 3 ch, 2dc in next stitch, skip 1 stitch, sc in the next stitch, 3 ch, 2dc in next stitch, sc in the next stitch, 3 ch, 2dc in next stitch, sc in the next stitch
Fastern off.


Orange wing
Rnd1: 4 ch, 3dc in 1st stitch, turn :: 3 stitches
Rnd2: 3 ch, 2dc in next stitch, dc in next stitch, 2dc in next stitch, turn :: 5 stitches
Rnd3: 3 ch, 2dc in next stitch,sl in the next stitch, 3 ch, 2 dc on sl, sl in the next stitch, 3 ch, 2dc on sl, sl in the next stitch.
Fastern off.


Red-orange wing
Rnd1: 4 ch, 3dc in 1st stitch, turn :: 3 stitches
Rnd2:  3 ch, 2dc in next stitch,sc in the next stitch, 3 ch, 2dc on previous sc, sc in the next stitch
Fastern off.


Mouth
Rnd1: 2 ch, 4 sc in the 1st chain, sl :: 4 stitches
Rnd2: 1 ch, [sc in next stitch, 2 sc in next stitch] 2 times, sl  :: 6 stitches
Rnd3: 1 ch, [sc in next stitch, 2 sc in next stitch] 3 times, sl :: 9 stitches
Fastern off.

Feet
Rnd1: 2 ch, 6 sc in the 1st chain, sl :: 6 stitches
Rnd2: 1 ch, [2 sc in next stitch, sc in next stitch] 3 times, sl  :: 9 stitches
Rnd3: 1 ch, sc in next 9 stitch, sl :: 9 stitches
Rnd4: 1 ch, [sc in next stitch, sc2tog] 3 times, sl :: 6 stitches
Fastern off.

Yellow Tail have two sides
Rnd1: 4 ch, 6 dc in 1st stitch, turn :: 6 stitches
Rnd2: 3 ch, dc in next 6 stitch, turn ::  6 stitches
For first side.
Rnd3: 3 ch, dc in next 3 stitch, turn :: 3 stitches
Rnd4: 3 ch, dc3tog, 1 ch, sl along the tail's side for neat look.
Fasten off.
For second side, join yarn to star crochet on the middle of Rnd2 and repeat Rnd3& Rnd4 again.
Rnd3: 3 ch, dc in next 3 stitch, turn :: 3 stitches
Rnd4: 3 ch, dc3tog, 1 ch, sl along the tail's side for neat look
Fasten off.


Orange tail
Rnd1: 4 ch, 6 dc in 1st stitch, turn :: 6 stitches
Rnd2: 3 ch, dc in next 3 stitch, turn :: 3 stitches
Rnd3: 3 ch, dc3tog, 1 ch, sl along the tail's side for neat look.
Fasten off.
For second side, join yarn to star crochet on the middle of Rnd1 and repeat Rnd2& Rnd3 again.
Rnd2: 3 ch, dc in next 3 stitch, turn :: 3 stitches
Rnd3: 3 ch, dc3tog, 1 ch, sl along the tail's side for neat look.


Red-orange tail
Rnd1: 4 ch, 6 dc in 1st stitch, turn :: 6 stitches
Rnd2: 3 ch, dc3tog, 3 ch, sl on the same stitch, 3 ch, dc3tog, 3 ch, sl ::  stitches
Fasten off.

Crown
Rnd1: 2 ch, 2 sc in the 1st chain, turn :: 2 stitches
Rnd2: 1 ch, 2 sc in next 2 stitch, turn :: 4 stitches
Rnd3: 1 ch, 2 sc in next 2 stitch, sc in next 2 stitch, 2 sc in next stitch,turn :: 6 stitches
Rnd4: 1 ch, sc in next 6 stitch, 6 ch, sl on 2nd stitch from hook, sl on next 2 chain, sl on next 2 chain, and fasten off.
Then join the yarn at the 1st stitch of Rnd4, 6 ch, sl on 2nd stitch from hook, sl on next 2 chain
Rnd5: 1 ch, sc in next 10 stitch, sl, turn :: 10 stitches
Rnd6: 1 ch, sc2tog, sc in next 6 stitch, sc2tog, turn :: 8 stitches
First side
Rnd7: 1 ch, sc in next 4 stitch, turn :: 4 stitches
Rnd8: 1 ch, sc in next 4 stitch, turn :: 4 stitches
Rnd9: 1 ch, sc in next stitch, sc2tog, sc in next stitch, turn :: 3 stitches
Rnd10: 1 ch, sc in next 3 stitch, turn :: 3 stitches
Rnd11: 1 ch, sc in next 3 stitch, turn :: 3 stitches
Rnd12: 1 ch, sc in next stitch, sc2tog, turn :: 2 stitches
Rnd13: 1 ch, sc in next 2 stitch, turn :: 2 stitches
Rnd14: 1 ch, sc2tog, turn :: 1 stitches
Rnd15: 1 ch, sc in next 1 stitch, turn :: 1 stitches
Rnd16: 1 ch, sl along the side.
Fasten off.
For second side, join yarn to star crochet on the middle of Rnd6 and work on the following Rnd7to Rnd15.
Rnd7: 1 ch, sc in next 4 stitch, turn :: 4 stitches
Rnd8: 1 ch, sc in next 4 stitch, turn :: 4 stitches
Rnd9: 1 ch, sc in next stitch, sc2tog, sc in next stitch, turn :: 3 stitches
Rnd10: 1 ch, sc in next 3 stitch, turn :: 3 stitches
Rnd11: 1 ch, sc in next 3 stitch, turn :: 3 stitches
Rnd12: 1 ch, sc in next stitch, sc2tog, turn :: 2 stitches
Rnd13: 1 ch, sc in next 2 stitch, turn :: 2 stitches
Rnd14: 1 ch, sc2tog, turn :: 1 stitches
Rnd15: 1 ch, sc in next 1 stitch, 1 ch, sl along the side.


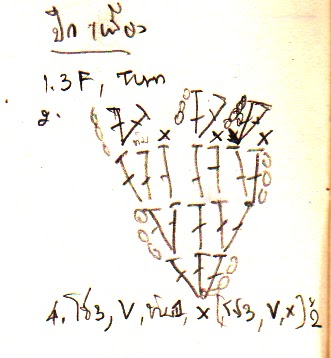
And the picture below is the whole pattern that I note during crochet it. For my Thai friends and some people who prefer xva form pattern, now it's available here: https://amigurumipianosound.blogspot.co.uk/2016/07/dota-2-phoenix-octo-thai-xva-pattern.html


******SELLING THE DOLL YOU MADE******
Visit private policy for more detail: https://amigurumipianosound.blogspot.co.uk/p/pattern-poly.html

*/*/* Helping translate from English to other language here: http://www.youtube.com/timedtext_cs_panel?tab=2&c=UCO6B-ObiFoh3cOemJQfoSJA
--------------------------------
FOLLOW ME ON
Youtube : https://www.youtube.com/channel/UCO6B-ObiFoh3cOemJQfoSJA
FACEBOOK: https://www.facebook.com/pianosound
Instagram: https://www.instagram.com/amigurumipianosound/
BLOGGER : https://amigurumipianosound.blogspot.com/
--------------------------------
SUPPORT this channel through:
Patreon :https://www.patreon.com/AmigurumiPianosound

Or purchase my paid pattern at
Craftsy : https://www.craftsy.com/user/2234916/pattern-store
ETSY: https://www.etsy.com/shop/Pianosound
RAVELRY : http://www.ravelry.com/patterns/sources/noramon-drons-ravelry-store/patterns


Thursday, April 21, 2016

Squirtle - Zenigame Pokemon Pattern

Squirtle - Zenigame Pokemon Free Amigurumi Crochet Pattern


And here come the last one in three pokemons pattern. It took quite sometime for this little squirtle pattern to be published. Because it a long holiday in Thailand, I took a trip to visit my grandma and after that I feel lazy. LoL

It took me two days to be active again but my laptop was not active as I was. It so slow and had an unusual heat emitted from itself(I think it because the summer heat here 41-43 Celsius). So I have to wait until nighttime so it can run normally. I wish I can afford air condition in our living room so summer time won't be this hot.

Moreover, while I was editing the video tutorial, there was black out! As you can guess, I didn't save my work so I have to do the editing all over again. I really wanna cry at that time but finally the video is published.


[Video tutorial]

Pattern instruction 
Head
Rnd1: Make an adjustable ring and work 6 sc in the ring, sl :: 6 stitches
Rnd2: 1 ch, [2 sc in next stitch] 6 times, sl :: 12 stitches
Rnd3: 1 ch, [sc in next stitch, 2 sc in next stitch] 6 times, sl :: 18 stitches
Rnd4: 1 ch, [sc in next 2 stitch, 2 sc in next stitch] 6 times, sl :: 24 stitches
Rnd5: 1 ch, [sc in next 3 stitch, 2 sc in next stitch] 6 times, sl :: 30 stitches
Rnd6: 1 ch, sc in next 30 stitch, sl :: 30 stitches
Rnd7: 1 ch, sc in next 30 stitch, sl :: 30 stitches
Rnd8: 1 ch, sc in next 30 stitch, sl :: 30 stitches
Rnd9: 1 ch, sc in next 30 stitch, sl :: 30 stitches
Rnd10: 1 ch, [sc in next 4 stitch, 2 sc in next stitch] 6 times, sl :: 36 stitches
Rnd11: 1 ch, sc in next 36 stitch, sl :: 36 stitches
Rnd12: 1 ch, [sc in next 4 stitch, sc2tog] 6 times, sl :: 30 stitches
Rnd13: 1 ch, [sc in next 3 stitch, sc2tog] 6 times, sl :: 24 stitches
Rnd14: 1 ch, [sc in next 2 stitch, sc2tog] 6 times, sl :: 18 stitches
Rnd15: 1 ch, [sc in next stitch, sc2tog] 6 times, sl :: 12 stitches
Rnd16: 1 ch, [sc2tog] 6 times, sl :: 6 stitches
Fasten off.

Body
Rnd1: Make an adjustable ring and work 6 sc in the ring, sl :: 6 stitches
Rnd2: 1 ch, [2 sc in next stitch] 6 times, sl :: 12 stitches
Rnd3: 1 ch, [sc in next stitch, 2 sc in next stitch] 6 times, sl :: 18 stitches
Rnd4: 1 ch, [sc in next 2 stitch, 2 sc in next stitch] 6 times, sl :: 24 stitches
Rnd5: 1 ch, sc in next 24 stitch, sl :: 24 stitches
Rnd6: 1 ch, sc in next 24 stitch, sl :: 24 stitches
Rnd7:1 ch, [sc in next 2 stitch, sc2tog] 6 times, sl :: 18 stitches
Rnd8: 1 ch, sc in next 18 stitch, sl :: 18 stitches
Rnd9: 1 ch, sc in next 18 stitch, sl :: 18 stitches
Rnd10: 1 ch, [sc in next stitch, sc2tog] 6 times, sl :: 12 stitches
Rnd11: 1 ch, sc in next 12 stitch, sl :: 12 stitches
Fasten off

Arms And Legs
Rnd1: Make an adjustable ring and work 6 sc in the ring, sl :: 6 stitches
Rnd2: 1 ch, sc in next 6 stitch, sl :: 6 stitches
Fasten off

Carapace
Rnd1: Make an adjustable ring and work 6 sc in the ring, sl :: 6 stitches
Rnd2: 1 ch, [2 sc in next stitch] 6 times, sl :: 12 stitches
Rnd3: 1 ch, [sc in next stitch, 2 sc in next stitch] 6 times, sl :: 18 stitches
Rnd4: 1 ch, sc in next 18 stitch, sl :: 18 stitches
Change to white yarn.
Rnd5: 1 ch, sc in next 18 stitch, sl :: 18 stitches
Fasten off

Tails
Rnd1: Make an adjustable ring and work 6 sc in the ring
Rnd2: 2 sc in next stitch, 2 hdc in next 3 stitch, 1 ch, turn
Rnd3: sc in next 2 stitch, 1 ch, turn
Rnd4: sc in next 2 stitch, 1 ch, turn
Fasten off

Stitch every parts together, the more neat you stitch, the more proper look it will be. But sewing can be annoying job for many people, and if you are not familiar with sewing you doll may not turn out as you want. Tip is to make sure that they are symmetry for both arms and legs, left and right. You can also glue them, if you really hate sewing, but be careful not to put too much glue, so it not clearly visible and reduce chance to dirty other parts.

After that, the most important assemble is the face! Even tough you mass up on sewing arms and legs, or your hand tension was not equal during crochet process. The most important things is you have to make sure the face of the doll is cute! Using pins to guide where you are going to stitch or embroidery first hand before doing the real job. And optional choice, adding pink cheek under the eyes area, this things add load of cuteness to our Squirtle.


I hope you guys like this pattern. If you have any question leave the comment here or at instruction video. Or else message me through my facebook page(www.facebook.com/pianosound) for quicker response.

If you are not familiar with US standard term, I have this pattern in XVA form here: https://amigurumipianosound.blogspot.com/2016/06/free-squirtle-thai-language-pattern-xva.html

Other pokemon pattern

Monday, February 29, 2016

Saitama - One punch man amigurumi

Saitama - One punch man amigurumi free pattern

"One punch man" is japanese anime that I recently watch. The theme is so simple one man who can defeat villain with just one punch. I think this anime is more into comedy genre more than action, and it make this anime very enjoyable to watch. From the picture below, I add the quote that Saitama, the main character, our doll, had say in the first episode on the speech bubble. LOL


I was really excite while making this video tutorial. First I have to say that while I was record the tutorial, I don't have this pattern in hand yet. I just recorded and imagined at the same time. So, at some part of tutorial you may find it not continuing. I cutting out the unnecessary part so the video won't be to long.(Even though it end up with 3 parts, lmao)


I used the picture of Saitama Nendoroid as a model. And I just realize that my doll has smaller head than the model. But I think if I make him in the same proportion, he may not be able to stand. I also surprise when he took his first stand, I didn't expect that at all. I just have a feeling like, hmm may be he can stand let's try it, if he cannot just cut this part out of the video. And eventually he can stand!! I don't know how to express my joyful at that time. I hope you guy like the pattern. I write it in standard American terms.


[VIDEO Part 1]

Materials
- Crochet hook size 3 mm. or Japanese size 5/0
- 4ply worst weight yarn color: red, yellow, white, black, beige

ABBREVIATION
ch- chain
sc- single crochet
dc - double crochet  
sl- slip stitch    
sc2tog- decrease single crochet

The doll starting from toe to shoulder, then we crochet separate head and attach them together with separate limps.
Legs
Rnd1: ch4, sc into the 2nd ch from hook, sc in next stitch, 3 sc in next stitch, sc in next stitch, 2 sc in next stitch, sl   :: 8 stitches
Rnd2: 1 ch, 2 sc in next stitch, sc in next stitch, [2 sc in next stitch] 3 times, sc in next stitch, [2 sc in next stitch] 2 times, sl :: 14 stitches
Rnd3: BLO, 1 chsc in next 14 stitch, sl  :: 14 stitches
Rnd4: 1 chsc in next 4 stitch, sc2tog 3 timessc in next 4 stitch, sl ::  11 stitches
Rnd5: 1 chsc in next 2 stitch, sc2togsc in next 3 stitch, sc2togsc in next 2 stitch, sl  :: 9 stitches
Rnd6: 1 chsc in next 9 stitch, sl  :: 9 stitches
Rnd7: 1 ch, [sc in next 2 stitch, 2 sc in next stitch] 3 times, sl :: 12 stitches
Rnd8: 1 ch[sc in next 3 stitch, 2 sc in next stitch] 3 times, sl :: 15 stitches
Change to yellow yarn
Rnd9: 1 ch, sc in next 15 stitch, sl  :: 15 stitches
Rnd10: 1 chsc in next 15 stitch, sl  :: 15 stitches
Rnd11: 1 chsc in next 15 stitch, sl  :: 15 stitches
Rnd12: 1 chsc in next 15 stitch, sl  :: 15 stitches
Rnd13: 1 chsc in next 4 stitch, 2 sc in next stitchsc in next 6 stitch, 2 sc in next stitch, sc in next 3 stitch,sl :: 17 stitches
Rnd14: 1 ch, sc in next 17 stitch, sl  :: 17 stitches
Rnd15: 1 ch, sc in next 17 stitch, sl  :: 17 stitches
FO the first legs, for the second leg do not fasten off and continued Rnd16.

Body
Rnd16: Join two legs together, 1 chsc in next 34 stitch, sl  :: 34 stitches
Rnd17: 1 chsc in next 34 stitch, sl  :: 34 stitches
Rnd18: 1 chsc in next 8 stitch, sc2tog, sc in next 4 stitch, sc2tog, sc in next 10 stitch, sc2tog, sc in next 4 stitch, sc2tog, sl :: 30 stitches
Rnd19: 1 chsc in next 30 stitch, sl  :: 30 stitches
Change to black yarn.
Rnd20: 1 chsc in front post for next 30 stitch, sl:: 30 stitches
Rnd21: 1 chsc in next 30 stitch, sl  :: 30 stitches
Change to yellow yarn
Rnd22: 1 chsc in front post for next 30 stitch, sl:: 30 stitches
Rnd23: 1 chsc in next 11 stitch, sc2tog, sc in next 12 stitch, sc2tog, sc in next 3 stitch, sl :: 28 stitches
Rnd24: 1 chsc in next 28 stitch, sl :: 28 stitches
Rnd25: 1 ch, sc in next 10 stitch, sc2tog, sc in next 13 stitch, sc2tog, sc in next stitch, sl:: 26 stitches
Rnd26: 1 ch, sc in next 4 stitch, sc2tog, sc in next 11 stitch, sc2tog, sc in next 7 stitch, sl :: 24 stitches
Rnd27: 1 chsc in next 24 stitch, sl :: 24 stitches
Rnd28: 1 chsc in next 4 stitch, sc2tog, sc in next 9 stitch, sc2tog, sc in next 7 stitch, sl :: 22 stitches
Rnd29: 1 chsc in next 22 stitch, sl :: 22 stitches
Rnd30: 1 chsc in next 14 stitch, 
White yarn, sc in next stitch, 
Yellow yarn, sc in next 7 stitch, sl :: 22 stitches
Rnd31: 1 chsc2tog, sc in next 3 stitch, sc2tog, sc in next 3 stitch, sc2tog, sc in next 2 stitch, 
White yarn, sc in next stitch, 
Yellow yarn, sc in next 2 stitch, sc2togsc in next 3 stitch, sl :: 18 stitches
Rnd32: 1 ch, sc in next 2 stitch, sc2tog, sc in next 2 stitch, sc2tog, sc in next 3 stitch, 
White yarn, sc in next stitch, 
Yellow yarn, sc2togsc in next 2 stitchsc2tog, sl :: 14 stitches

Rnd33: White yarn, 1 ch, [sc in next stitchsc2tog]* 4 time, sc in next 2 stitchsl :: 10 stitches
Fasten off

Belt's buckle with orange color yarn.
Rnd1: Make an adjustable ring and work 6 sc in the ring, sl :: 6 stitches

Alternative way for belt's bucket, cutting yellow felt sheet into circular shape instead. I don't have color felt in my stock so I cannot do that. 


[VIDEO Part 2 ]

Head
Rnd1: Make an adjustable ring and work 6 sc in the ring, sl :: 6 stitches
Rnd2: 1 ch, [2 sc in next stitch] 6 times, sl :: 12 stitches
Rnd3: 1 ch, [sc in next stitch, 2 sc in next stitch] 6 times, sl :: 18 stitches
Rnd4: 1 ch, [sc in next 2 stitch, 2 sc in next stitch] 6 times, sl :: 24 stitches
Rnd5: 1 ch, [sc in next 3 stitch, 2 sc in next stitch] 6 times, sl :: 30 stitches
Rnd6: 1 ch, [sc in next 4 stitch, 2 sc in next stitch] 6 times, sl :: 36 stitches
Rnd7: 1 ch, [sc in next 5 stitch, 2 sc in next stitch] 6 times, sl :: 42 stitches
Rnd8: 1 chsc in next 42 stitch, sl :: 42 stitches
Rnd9: 1 ch, [sc in next 6 stitch, 2 sc in next stitch] 6 times, sl :: 48 stitches
Rnd10: 1 chsc in next 48 stitch, sl :: 48 stitches
Rnd11: 1 chsc in next 48 stitch, sl :: 48 stitches
Rnd12: 1 chsc in next 48 stitch, sl :: 48 stitches
Rnd13: 1 chsc in next 48 stitch, sl :: 48 stitches
Rnd14: 1 chsc in next 48 stitch, sl :: 48 stitches
Rnd15: 1 ch, [sc in next 6 stitch, sc2tog] 6 times, sl:: 42 stitches
Rnd16: 1 chsc in next 42 stitch, sl :: 42 stitches
Rnd17: 1 chsc in next 42 stitch, sl :: 42 stitches
Rnd18: 1 ch, [sc in next 5 stitch, sc2tog] 6 times, sl:: 36 stitches
Rnd19: 1 chsc in next 36 stitch, sl :: 36 stitches
Rnd20: 1 chsc in next 36 stitch, sl :: 36 stitches
Rnd21: 1 chsc in next 36 stitch, sl :: 36 stitches
Rnd22: 1 ch, [sc in next 4 stitch, sc2tog] 6 times, sl:: 30 stitches
Rnd23: 1 ch, [sc in next 3 stitch, sc2tog] 6 times, sl:: 24 stitches
Rnd24: 1 ch, [sc in next 2 stitch, sc2tog] 6 times, sl:: 18 stitches
Rnd25: 1 ch, [sc in next stitch, sc2tog] 6 times, sl:: 12 stitches
Rnd26: 1 ch, [sc2tog] 6 times, sl:: 6 stitches
Fasten off

Eyes(White)
Rnd1: ch4, sc into the 2nd ch from hook, sc in next stitch, 3 sc in next stitch, sc in next stitch, 2 sc in next stitch, sl  :: 8 stitches
Fasten off

Optional for eyes, instead of crochet them, you can cut some white felt sheet into oval shape and using them to decorate as eyes. This option come with more advantage, you can just use permanent pen to dot his black eyes! Sound easy, right? But beware not to dirty the ink, since it permanent. Also red felt sheet can be cut to triangular shape for his mouth too.

Ears
Rnd1: ch3, 5 hdc into the 1st ch, Fasten off


[VIDEO Part 3]

Arms Start with red yarn.
Rnd1: Make an adjustable ring and work 6 sc in the ring, sl :: 6 stitches
Rnd2: 1 ch, [sc in next 2 stitch, 2 sc in next stitch] 2 times, sl :: 8 stitches
Rnd3: 1 chsc in next 8 stitch, sl :: 8 stitches
Rnd4: 1 chsc in next 7 stitch, bubble, sl ::  stitches
Rnd5: 1 chsc in next 8 stitch, sl :: 8 stitches
Rnd6: 1 chsc in next 8 stitch, sl :: 8 stitches
Rnd7: 1 chsc in next 8 stitch, sl :: 8 stitches
Rnd8: 1 ch, [sc in next 3 stitch, 2 sc in next stitch] 2 times, sl :: 10 stitches
Change to yellow yarn.
Rnd9: Work in front post1 ch, [sc in next 3 stitch, sc2tog] 2 times, sl:: 8 stitches
Rnd10 - Rnd14: 1 chsc in next 8 stitch, sl :: 8 stitches
Rnd15: 1 ch, [sc2tog] 4 times, sl:: 4 stitches
Fasten off

Cape Start with white yarn. 
Rnd1: 25 ch, dc into the 4th ch from hook,  dc in next 21 stitch, turn :: 22 stitches
Rnd2: 3 ch, dc in next 19 stitch, turn :: 19 stitches
Rnd3: 3 ch, dc in next 11 stitchtr in next 8 stitch, turn :: 19 stitches
Rnd4: 4 ch, tr in next 7 stitchdc in next 12 stitch, turn :: 19 stitches
Rnd5: 5 ch, dc into the 4th ch from hook,  dc in next 21 stitch, turn :: 22 stitches
Rnd6: 4 ch, tr in next 11 stitchdc in next 3 stitch, sc in next 2 stitchsl in next 2 stitch
Fasten off
Rnd7: Start at the same reflected side of cape, on Rnd1. sl in next 2 stitch, sc in next 2 stitch, dc in next 3 stitch, tr in next 11 stitch
1 ch, sc along cape's trail.

To be honest I think I didn't do well on the cape job, so you're encourage to modified it to look better! After you are finished crochet every parts sewing them attach together. But if sewing is annoying job for you, and if you are not familiar with sewing you doll may not turn out as you want. Tip is to make sure that they are symmetry for both arms and legs. You can also glue them, if you really hate sewing that much, but be careful not to put too much glue, so it not clearly visible and reduce chance to dirty other part.

That's it. Hope you enjoy the pattern, any problems during making him, comment below or under tutorial video. I will try answer you as fast as I can. If you make doll from this pattern, send me the photo to my facebook


What you want me to crochet next leave the comment below. :)

-If you face any problems during crochet this leave the comments under the video.  
I will answer you as fast as I can. And we can share the solution with others.

Subscribe here: https://www.youtube.com/c/amigurumipianosound

The written pattern is on my blog : http://amigurumipianosound.blogspot.com/
My other Free Crochet Patterns are also on my blog.

******SELLING THE DOLL YOU MADE******
Visit private policy for more detail: https://amigurumipianosound.blogspot.co.uk/p/pattern-poly.html

*/*/* Helping translate from English to other language here: http://www.youtube.com/timedtext_cs_panel?tab=2&c=UCO6B-ObiFoh3cOemJQfoSJA
--------------------------------
FOLLOW ME ON 
Youtube : https://www.youtube.com/channel/UCO6B-ObiFoh3cOemJQfoSJA
FACEBOOK: https://www.facebook.com/pianosound
Instagram: https://www.instagram.com/amigurumipianosound/
BLOGGER : https://amigurumipianosound.blogspot.com/
--------------------------------
SUPPORT this channel through:
Patreon :https://www.patreon.com/AmigurumiPianosound

Or purchase my paid pattern at 
Craftsy : https://www.craftsy.com/user/2234916/pattern-store
ETSY: https://www.etsy.com/shop/Pianosound
RAVELRY : http://www.ravelry.com/patterns/sources/noramon-drons-ravelry-store/patterns